Origami Hat Steps With Pictures. A4 paper or a3 for a bigger one you can also use newspaper but normal paper is better so go and get that a4 a3 page or newspaper now. 9 amazing dollar bill origami projects.
It’s harder to design easy models than it is to design complex ones. To make an inside reverse fold, pry open the top tip. Next fold the right edge over to the left edge and crease well.
I Recommend Using Origami Paper If You Want Them To Turn Out Nice, But Regular Paper Will Do Fine For Simple Diagrams.
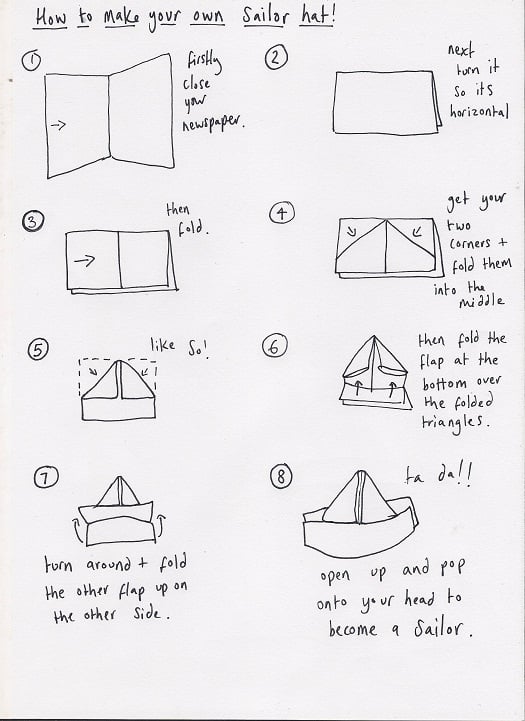
Fold the paper crosswise in half. Learn how to make easy origami with these simple instructions. Fold the top edge down to the bottom edge.
To Make An Inside Reverse Fold, Pry Open The Top Tip.
Many origami models also have videos you can watch! Fold the left and right corners to the center to form a triangle. Click “like” below if you like this origami hat!
1 Obtain A Piece Of 8 1/2 X 11 Inch Computer Paper.
The finished product is perfect for birthday parties, plays, or just an afternoon of fun. Start with a square piece of green origami paper, face the colored side down. Turn the origami to the other side.
Bring The Left And Right Corner To The Middle Crease As Shown.
Crease it well and unfold. Fold the left and right corner to the center as shown. Make sure to fold the outer layer only.
Put The Hat On And You’re Done!
The next step is to fold the paper downwards in half. Start with a rectangular piece of paper, white side up. See origami instructions stock video clips.


